ThinkGeo Cloud
ThinkGeo UI Controls
ThinkGeo Open Source
Help and Support
External Resources
ThinkGeo Cloud
ThinkGeo UI Controls
ThinkGeo Open Source
Help and Support
External Resources
Note: The page was created before Map Suite 10. Map Suite 10.0 organized many classes into new namespaces and assemblies as well as had a few minor breaks in compatibility. The majority of previously built code should work without modification assuming the new namespaces are added. For guidance on upgrading your existing code, please check out MapSuite 10 Upgrade Guide.
The Map Suite Silverlight Edition illustrated QuickStart Guide will guide you through the process of creating a sample application and will help you become familiar with Map Suite. This edition of the QuickStart Guide supports Silverlight Edition 9.0.0.0 or higher.
Welcome to Map Suite™ Silverlight Edition from ThinkGeo, a full-featured mapping control that makes it easy for any Microsoft .NET developer to add mapping functionality to a Microsoft .NET and Silverlight application quickly and efficiently. Using the intuitive object model, even developers inexperienced in Geographic Information Systems (GIS) can have fully functional maps working in minutes.
The purpose of this guide is to help you quickly get started building your own spatially aware applications. Like any new software, there is some learning to be done along the way.
How do we start to learn how to take advantage of the power of Map Suite? The best way is to make a sample application with it.
Before we get started, make sure that you have installed the ThinkGeo Product Center and that you have either started an evaluation or activated a full license of Map Suite Silverlight Edition. By default, this will install the Map Suite Silverlight Edition 9.0 assemblies to C:\Program Files (x86)\ThinkGeo\Map Suite 9.0\Map Suite Silverlight.
Before you begin, you'll need to download and install one of the following:
These add-ons for Visual Studio or Visual Web Developer Express will install the necessary Visual Studio updates, Silverlight project templates, developer runtime, and SDK.
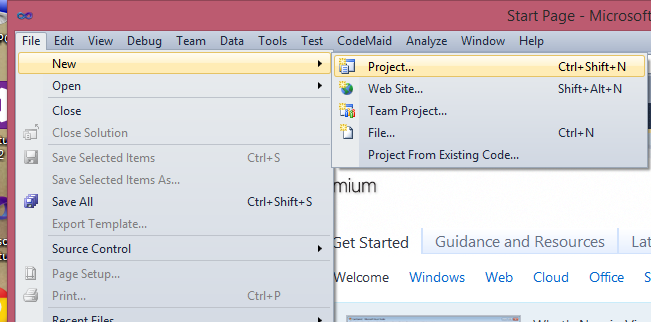
Let's start with a new ASP.NET Silverlight Application in Microsoft Visual Studio (2010 or newer) and call it “HelloWorld” (see Figures 1, 2, and 3). Set the Templates to “.NET Framework 4.0” for the project.

Figure 1. Creating a new project in Microsoft Visual Studio.

Figure 2. Select Silverlight Application and name it “HelloWorld”.

Figure 3. Choose “Add a new ASP.NET Web project to the solution to host Silverlight.
1. When you first open Microsoft Visual Studio after installing Map Suite, you may not see the control in the Toolbox. You will need to follow these steps to add the control.
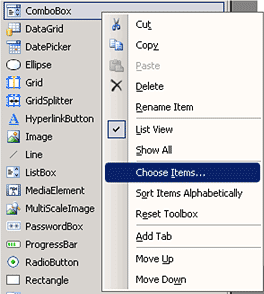
First of all, let's add the control for the Silverlight Toolbox. Double-click “Page.xaml” in the HelloWorld project, make sure your toolbox contains Silverlight XAML controls, then hover over the Toolbox and right-click anywhere on the list of controls. You will get a pop-up menu. Select “Choose Items…” (See Figure 4)

Figure 4. Select “Choose Items”.
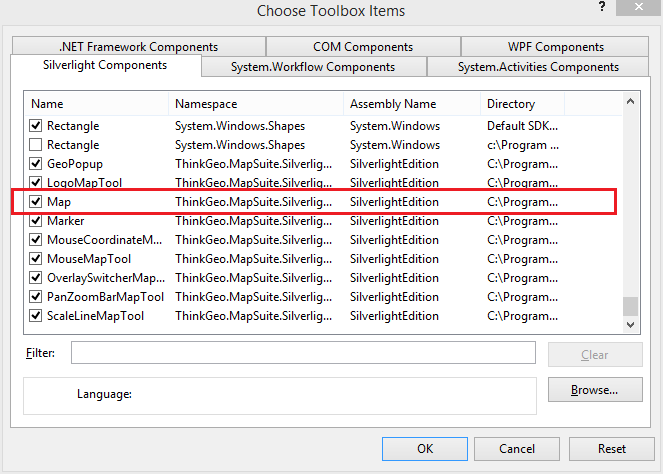
2. The “Choose Toolbox Items” dialogue will appear. Within this dialogue, switch to the Silverlight Components tab; then click the “Browse…” button. Finally, navigate to the C:\Program Files (x86)\ThinkGeo\Map Suite 9.0\Map Suite Silverlight\Current Version\Managed Assemblies\Client\SilverlightEdition.dll file.

The “Map” control will appear in the Choose Toolbox Items list. Click OK to confirm this operation.
3. You should now have the Map control available in your Toolbox as shown in Figure 6 below.

Figure 6. Silverlight Map is now available in the toolbox.
4. Let's go to the XAML code area, and make the UserControl bigger. We'll set it to 800×600. (See Figure 7)

Figure 7. Set the user control's size to 800×600.
5. Drag the map icon from the toolbox into the XAML code, then set its name to “Map1” and its size to 800×600. (See Figure 8)

Figure 8. The Silverlight map namespace is now added into XAML automatically.
1. On server side, you also need to follow these steps to add the connector. Hover on Toolbox and right click anywhere on list of controls, you will get a pop-up menu. Choose “Choose Items…”.
2. The “Choose Toolbox Items” dialogue will appear. Within this dialogue, select the .NET Framework Components tab; then click the “Browse…” button. Finally, navigate to the C:\Program Files (x86)\ThinkGeo\Map Suite 9.0\Map Suite Silverlight\Current Version\Managed Assemblies\Server\SilverlightMapConnector.dll file.
3. You should now have the SilverlightMapConnector available in your Toolbox as shown in Figure below.
Now the SilverlightMapConnector can be dragged onto your aspx page. Let's drag one into the “Default.aspx” page now. In order to work with a Silverlight map, you also need to drag a ScriptManager onto the web page.
Note: If you are using Map Suite Silverlight Edition version 9.0.0.0 or later, you also need to add “WindowsBase.dll” to the references. WindowsBase can be found on the .NET tab of the Add Reference dialog. If you don't do this, you will get the following error when you compile the project: “The type 'System.Collections.Specialized.INotifyCollectionChanged' is defined in an assembly that is not referenced. You must add a reference to assembly 'WindowsBase, Version=3.0.0.0, Culture=neutral, PublicKeyToken=31bf3856ad364e35'.”
1. Copy Shape data files (SHP, SHX, DBF, IDS, IDX…) into your Silverlight application, and set their build action to “Content”.
Silverlight applications run at the client's machine, so these Shape files will be integrated into the XAP file and run at the client side. Later, we'll introduce a way to render your map at the server side.
2. Add “SilverlightEdition.dll”, “SilverlightMapSuiteCore.dll”, “SilverlightGeoApi.dll”, and “SilverlightNetTopologySuite.dll” to the Silverlight project reference.
Here we use ShapeFileFeatureLayer, so we can access the files in isolated storage or load them from resource. For this example, we'll choose to load them from resource. If you want to load from isolated storage, please remove the StreamLoading event line from the code below.
using System;
using System.IO;
using System.Windows;
using System.Windows.Controls;
using System.Windows.Media;
using System.Windows.Resources;
using ThinkGeo.MapSuite.SilverlightEdition;

namespace HelloWorld
{
    public partial class Page : UserControl
    {
        public Page()
        {
            InitializeComponent();
            Loaded += new RoutedEventHandler(Page_Loaded);
        }

        private void Page_Loaded(object sender, RoutedEventArgs e)
        {

         Map1.MapUnit = GeographyUnit.DecimalDegree;

        ShapeFileFeatureLayer statesLayer = new ShapeFileFeatureLayer("STATES.SHP");

        // Add a handler to load shape files from resource.
        // If you remove this handler, the map control will find Shape files from isolatedStorage,
        // so in that case, please make sure your Shape file is in the isolatedStorage first.
            ((ShapeFileFeatureSource)statesLayer.FeatureSource).StreamLoading += new EventHandler<StreamLoadingEventArgs>(StatesLoadAShapeFile_StreamLoading);

        // Set the statesLayer's style
            statesLayer.ZoomLevelSet.ZoomLevel01.DefaultAreaStyle = AreaStyles.CreateSimpleAreaStyle(GeoColor.FromArgb(255, 243, 239, 228), GeoColor.FromArgb(255, 218, 193, 163), 1);

        // This setting will apply from ZoonLevel01 to ZoomLevel20.
        // That means we display the map in the same style as ZoomLevel01 at all times, no matter how far we zoom in or out.
            statesLayer.ZoomLevelSet.ZoomLevel01.ApplyUntilZoomLevel = ApplyUntilZoomLevel.Level20;

        // We need to add the world layer to its overlay.
            LayerOverlay layerOverlay = new LayerOverlay();
            layerOverlay.Layers.Add(statesLayer);

        // We need to add the overlay to the map.
            Map1.Overlays.Add(layerOverlay);

        // Set a proper center and zoom level Id for the map; that's the place you want it to display.
        // Please see the overload of this method.
            Map1.ZoomTo(new PointShape(-100, 35), 4);
        }

    // Load Shape files from resource.
        private void StatesLoadAShapeFile_StreamLoading(object sender, StreamLoadingEventArgs e)
        {
            switch (System.IO.Path.GetExtension(e.AlternateStreamName).ToLower())
            {
                case ".shp":
                    StreamResourceInfo sr = Application.GetResourceStream(new Uri(@"App_Data/STATES.SHP", UriKind.RelativeOrAbsolute));
                    e.AlternateStream = sr.Stream;
                    break;
                case ".dbf":
                    e.AlternateStream = Application.GetResourceStream(new Uri("App_Data/STATES.DBF", UriKind.RelativeOrAbsolute)).Stream;
                    break;
                case ".shx":
                    e.AlternateStream = Application.GetResourceStream(new Uri("App_Data/STATES.SHX", UriKind.RelativeOrAbsolute)).Stream;
                    break;
                case ".idx":
                    e.AlternateStream = Application.GetResourceStream(new Uri("App_Data/STATES.idx", UriKind.RelativeOrAbsolute)).Stream;
                    break;
                case ".ids":
                    e.AlternateStream = Application.GetResourceStream(new Uri("App_Data/STATES.ids", UriKind.RelativeOrAbsolute)).Stream;
                    break;
                default:
                    break;
            }
        }

    }
}
If you compile and run what you have now, your map should look like the one below. (See Figure 9)
With the code above, not only can you display a map, but you can also navigate it. You can pan by dragging the map; track zoom in by drawing a rectangle with your left mouse button mouse while holding the shift key; navigate by using the controls at the top left corner of the map, or zoom in and out by using the mouse wheel. Very powerful for just couple lines of code, isn't it?
The TextStyle is used to label items on map. Because every Shape file has a related .dbf file that includes descriptions for each record, the most common way to use the TextStyle is for labeling. For example, the Shape file containing the names of the states of the US has a corresponding .dbf file that contains the field “STATE_NAME”. We can use this field to label the states on our map. (See Figure 10)

Figure 10. The STATE_NAME column in the DBF file.
Map Suite has many TextStyles built in that will help us quickly design attractive labels for the states on our map. We can just pick the TextStyle we like and use it.
private void Page_Loaded(object sender, RoutedEventArgs e)
    {
        Map1.MapUnit = GeographyUnit.DecimalDegree;

        ShapeFileFeatureLayer statesLayer = new ShapeFileFeatureLayer("STATES.SHP");
        ((ShapeFileFeatureSource)statesLayer.FeatureSource).StreamLoading += new EventHandler<StreamLoadingEventArgs>(StatesLoadAShapeFile_StreamLoading);
        statesLayer.ZoomLevelSet.ZoomLevel01.DefaultAreaStyle = AreaStyles.CreateSimpleAreaStyle(GeoColor.FromArgb(255, 243, 239, 228), GeoColor.FromArgb(255, 218, 193, 163), 1);

        // We'll use a preset TextStyle. Here we passed in the "STATE_NAME", which is the name of the field we want to display on map.
        statesLayer.ZoomLevelSet.ZoomLevel01.DefaultTextStyle = TextStyles.Canal1("STATE_NAME");
        statesLayer.ZoomLevelSet.ZoomLevel01.ApplyUntilZoomLevel = ApplyUntilZoomLevel.Level20;

        LayerOverlay layerOverlay = new LayerOverlay();
        layerOverlay.Layers.Add(statesLayer);
        Map1.Overlays.Add(layerOverlay);

        // Set the center and zoom level Id to locate the map's position.
        Map1.ZoomTo(new PointShape(-100, 35), 4);
    }
The result is as follows (Figure 11):

Figure 11. Map of the US with states labeled.
Now that we know how to render text and render symbols, let's define two different ZoomLevels for one single layer.
private void Page_Loaded(object sender, RoutedEventArgs e)
    {
        Map1.MapUnit = GeographyUnit.DecimalDegree;

        // Set the background color to make the map beautiful.
        Map1.Background = new SolidColorBrush(Color.FromArgb(255, 156, 187, 216));

        ShapeFileFeatureLayer statesLayer = new ShapeFileFeatureLayer("STATES.SHP");
        ((ShapeFileFeatureSource)statesLayer.FeatureSource).StreamLoading += new EventHandler<StreamLoadingEventArgs>(StatesLoadAShapeFile_StreamLoading);
        statesLayer.ZoomLevelSet.ZoomLevel01.DefaultAreaStyle = AreaStyles.CreateSimpleAreaStyle(GeoColor.FromArgb(255, 243, 239, 228), GeoColor.FromArgb(255, 218, 193, 163), 1);
        statesLayer.ZoomLevelSet.ZoomLevel01.DefaultTextStyle = TextStyles.Canal1("STATE_NAME");
        statesLayer.ZoomLevelSet.ZoomLevel01.ApplyUntilZoomLevel = ApplyUntilZoomLevel.Level05;

        statesLayer.ZoomLevelSet.ZoomLevel06.DefaultAreaStyle = AreaStyles.CreateSimpleAreaStyle(GeoColor.FromHtml("#EFEFEF"), GeoColor.FromHtml("#CCCCCC"), 1);
        statesLayer.ZoomLevelSet.ZoomLevel06.DefaultTextStyle = TextStyles.Capital3("STATE_NAME");
        statesLayer.ZoomLevelSet.ZoomLevel06.ApplyUntilZoomLevel = ApplyUntilZoomLevel.Level20;

        LayerOverlay layerOverlay = new LayerOverlay();
        layerOverlay.Layers.Add(statesLayer);
        Map1.Overlays.Add(layerOverlay);

        Map1.ZoomTo(new PointShape(-100, 35), 4);
    }
Can you imagine what the map will look like now? Figures 12 and 13 below demonstrate the result. At first it looks the same as it did in Figure 11. Now zoom in, and watch the map change to resemble Figure 13 as you do.

Figure 12. Map of US states with two ZoomLevels, before zooming in.

Figure 13. Map of US states two ZoomLevels, after zooming in.
If there are too many shapes drawn at the client side, the performance of your Silverlight application will slow down. To get around this, you can choose to render an overlay at the server side. The following steps will show you how to do that.
This overlay helps you create a simple WMS server, which is used by the map control to get map tile images.
First, copy the country shape file data into the web project:
You may be asking how the ServerOverlay gets rendered on the client side. In the “SilverlightEdition.dll”, there is a ServerOverlay object which, on the client side, is just a “shell” that will accept the actual overlay that is created on the server side by the “SilverlightMapConnector.dll”. We use a connector ID to keep track of these overlays as they pass from the server to the client side.
Code in “Default.aspx.cs” in the Silverlight project:
using System;
using System.Web.UI;
using ThinkGeo.MapSuite.Core;
using ThinkGeo.MapSuite.SilverlightEdition;

namespace HelloWorld.Web
{
    public partial class _Default : System.Web.UI.Page
    {
        protected void Page_Load(object sender, EventArgs e)
        {
            if (!Page.IsPostBack)
            {

                ShapeFileFeatureLayer worldLayer = new ShapeFileFeatureLayer(MapPath("~/app_data/cntry02.shp"));
                worldLayer.ZoomLevelSet.ZoomLevel01.DefaultAreaStyle = AreaStyles.CreateSimpleAreaStyle(GeoColor.FromArgb(255, 243, 239, 228), GeoColor.FromArgb(255, 218, 193, 163), 1);
                worldLayer.ZoomLevelSet.ZoomLevel01.ApplyUntilZoomLevel = ApplyUntilZoomLevel.Level20;
                ServerLayerOverlay layerOverlay = new ServerLayerOverlay("NativeServer");
                layerOverlay.Layers.Add(worldLayer);

                SilverlightMapConnector1.ServerLayerOverlays.Add(layerOverlay);
            }
        }
    }
}
Code in “Page.xaml.cs” in the Silverlight project:
private void Page_Loaded(object sender, RoutedEventArgs e)
    {
        Map1.MapUnit = GeographyUnit.DecimalDegree;
        Map1.Background = new SolidColorBrush(Color.FromArgb(255, 156, 187, 216));

        ServerLayerOverlay serverOverlay = new ServerLayerOverlay("NativeServer", "SilverlightMapConnector1");
        Map1.Overlays.Add(serverOverlay);

        ShapeFileFeatureLayer statesLayer = new ShapeFileFeatureLayer("STATES.SHP");
        ((ShapeFileFeatureSource)statesLayer.FeatureSource).StreamLoading += new EventHandler<StreamLoadingEventArgs>(StatesLoadAShapeFile_StreamLoading);
        statesLayer.ZoomLevelSet.ZoomLevel01.DefaultAreaStyle = AreaStyles.CreateSimpleAreaStyle(GeoColor.FromArgb(255, 243, 239, 228), GeoColor.FromArgb(255, 218, 193, 163), 1);
        statesLayer.ZoomLevelSet.ZoomLevel01.DefaultTextStyle = TextStyles.Canal1("STATE_NAME");
        statesLayer.ZoomLevelSet.ZoomLevel01.ApplyUntilZoomLevel = ApplyUntilZoomLevel.Level05;

        statesLayer.ZoomLevelSet.ZoomLevel06.DefaultAreaStyle = AreaStyles.CreateSimpleAreaStyle(GeoColor.FromHtml("#EFEFEF"), GeoColor.FromHtml("#CCCCCC"), 1);
        statesLayer.ZoomLevelSet.ZoomLevel06.DefaultTextStyle = TextStyles.Capital3("STATE_NAME");
        statesLayer.ZoomLevelSet.ZoomLevel06.ApplyUntilZoomLevel = ApplyUntilZoomLevel.Level20;

        LayerOverlay layerOverlay = new LayerOverlay();
        layerOverlay.Layers.Add(statesLayer);
        Map1.Overlays.Add(layerOverlay);

        Map1.ZoomTo(new PointShape(-100, 35), 4);
    }
Don't forget to set the “Default.aspx” file as the Start Page. Click “Run” to see what the map looks like.
You now know the basics of using Map Suite Silverlight Edition and are able to start adding this functionality into your own applications. Let's recap what we have learned about the object relationships and how the pieces of Map Suite work together: