ThinkGeo Cloud
ThinkGeo UI Controls
ThinkGeo Open Source
Help and Support
External Resources
ThinkGeo Cloud
ThinkGeo UI Controls
ThinkGeo Open Source
Help and Support
External Resources
Note: The page was created before Map Suite 10. Map Suite 10.0 organized many classes into new namespaces and assemblies as well as had a few minor breaks in compatibility. The majority of previously built code should work without modification assuming the new namespaces are added. For guidance on upgrading your existing code, please check out MapSuite 10 Upgrade Guide.
The Map Suite MVC Mobile-Based QuickStart Guide will guide you through the process of creating a sample application and will help you become familiar with using Map Suite to create mobile-friendly applications. This edition of the QuickStart Guide supports Map Suite MVC Edition 6.0 and higher, and will show you how to create a mobile-centric ASP.NET MVC application.
Welcome to Map Suite™ MVC Edition from ThinkGeo, a full-featured mapping control that makes it easy for any Microsoft .NET developer to add mapping functionality to a Microsoft .NET application quickly and efficiently. Using the intuitive object model, even developers inexperienced in Geographic Information Systems (GIS) can have fully functional maps working in minutes.
The purpose of this guide is to help you quickly get started building mobile-friendly GIS applications. Like any new software, there is some learning to be done along the way.
How do we start to learn how to take advantage of the power of Map Suite? The best way is to make a sample application with it. For the purposes of this guide, let's assume we have installed the Map Suite MVC Edition 6.0 to the default folder C:\Program Files\ThinkGeo\Map Suite MVC Evaluation Edition 6.0.
Download Sample Code From This Exercise (5.04 MB)
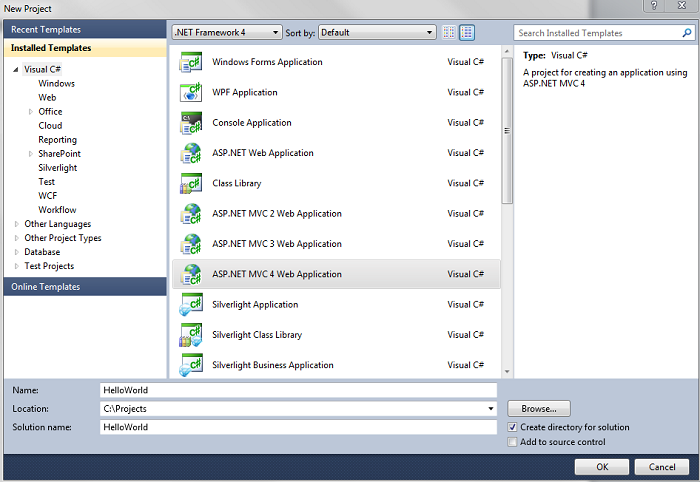
Let's start with a new ASP.NET MVC 4 web application in Visual Studio.NET 2010 IDE and call it “HelloWorld” (see Figure 1). Set the Templates to “.NET Framework 4.0” for the project.
In the next wizard page, select the “Mobile Application” template. This means that your sample project will have some built-in pages and functionalities such as forms authentication; you can remove these if you don't need them. The template will also add the jQuery Mobile framework to your application automatically. This framework provides a set of touch-friendly UI widgets and an AJAX-powered navigation system to support animated page transitions.
Finally, select “Razor” as the view engine.
(NOTE: Map Suite MVC Edition supports both the Razor and ASPX view engines. In this guide we will be using the Razor engine as an example.)
This Quick Start Guide uses an ASP.NET MVC 4 web application as an example, so you will need to have the ASP.NET MVC 4 framework installed in order to follow along. It can be downloaded from ASP.NET MVC 4 Beta.

Figure 1. Creating a new project in the Visual Studio.NET 2010 IDE.

Figure 2. Select “ASP.NET MVC 4 Web Application” and name it “HelloWorld”.
{mvcedition:Mobile Img03.jpg}}
Figure 3. Select “Mobile Application” and choose the Razor view engine.

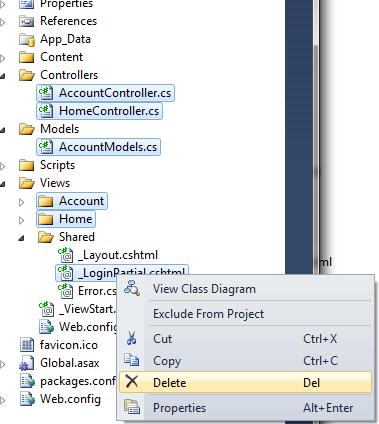
Figure 4. Remove the files shown, as we will not be needing them.

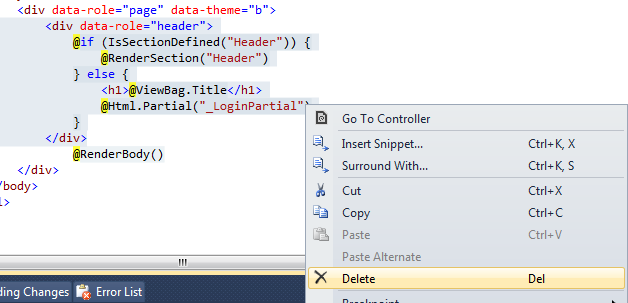
Figure 5. Remove the code shown from _Layout.cshtml (we'll use our own code later).
We need to add two Map Suite files, MvcEdition.dll and MapSuiteCore.dll, to the reference. Right-click on “References” in Solution Explorer and select “Add Reference…”, navigate to the C:\Program Files\ThinkGeo\Map Suite MVC Evaluation Edition 6.0\Developer Reference\MVC Edition folder and select both MvcEdition.dll and MapSuiteCore.dll.
You will also need to add WindowsBase.dll to the reference; it can be found on the .NET tab of the Add Reference dialog. If you don't do this, you will get the following error when you compile the project: “The type 'System.Collections.Specialized.INotifyCollectionChanged' is defined in an assembly that is not referenced. You must add a reference to assembly 'WindowsBase, Version=3.0.0.0, Culture=neutral, PublicKeyToken=31bf3856ad364e35'.”
Now that we have the required DLLs referenced, we are ready to add the code needed to display a map.
In Solution Explorer, right-click on the “Controller” folder, then navigate to “Add” and select “Controller…” to add a new controller page named “HomeController”. It should look like the screenshot below:
Now move your mouse pointer over the code return View() and right-click to add the responding view page. Keep all of the default settings as shown below:
In this section, you'll use Map Suite MVC Edition to display a map that uses your own data.
To begin, in the View page, let's write a few lines of code that will display a simple map. Next, we'll have a look at the data and the important objects that we will use.
In creating our “Hello World” sample application, our first step is to set a reference to the Map Suite Core and Map Suite MVC Edition workspaces at the very top of the View page, as we will use many classes within both of these. We do this so that we do not have to use the fully qualified name of the Map Suite classes throughout our code. Set the reference like this:
@using ThinkGeo.MapSuite.MvcEdition
@using ThinkGeo.MapSuite.Core
Then, just add the following code to Index.cshtml:
<div>
    @{
        Html.ThinkGeo().Map("Map1", 600, 500)
        .MapBackground(new BackgroundLayer(new GeoSolidBrush(GeoColor.FromHtml("#E5E3DF"))))
        .CurrentExtent(-131.22, 55.05, -54.03, 16.91)
        .MapUnit(GeographyUnit.DecimalDegree)
        .CustomOverlays(overlays => overlays.WorldMapKitWmsWebOverlay())
        .Render();
    }
</div>
If you run your project now and view it on a mobile device, such as an Apple iPad®, you will see it looks like this:
The next step is to make this application's user interface more suitable for use on a mobile device. This section of the Quick Start Guide will show you how to begin by adding a header and footer to your mobile application.
Let's begin by adding a new cshtml file named Header.cshtml in the project's /Views/Shared folder.
In Header.cshtml, add the following code:
<div data-role="header">
    <h1>
        Map Suite Mobile Samples
    </h1>
</div>
We can add a Footer in same way. Create a cshtml file called Footer.cshtml in the /Views/Shared folder and add the code below:
<div data-role="footer">
</div>
Now, we need to change the code in _Layout.cshtml to match the following:
<div data-role="page" data-theme="b">
    @Html.Partial("Header")
    @RenderBody()
    @Html.Partial("Footer")
 </div>
Run your application again. Now the result looks like this:
As you can see in the previous screenshot, it's very important in a mobile application that the application can fill the screen without any blank gaps when using any one of several screen resolutions. To solve this problem and make our mobile UI more responsive, we have to do following things.
1. Change the view page code as follows:
<div  data-role="content">
 @{
    Html.ThinkGeo().Map("Map1",
           new System.Web.UI.WebControls.Unit(100,System.Web.UI.WebControls.UnitType.Percentage),
           new System.Web.UI.WebControls.Unit(100,System.Web.UI.WebControls.UnitType.Percentage))
        .MapBackground(new BackgroundLayer(new GeoSolidBrush(GeoColor.FromHtml("#E5E3DF"))))
        .CurrentExtent(-131.22, 55.05, -54.03, 16.91)
        .MapUnit(GeographyUnit.DecimalDegree)
        .CustomOverlays(overlays => overlays.WorldMapKitWmsWebOverlay())
        .Render();
 }
<div>
The code above sets the width and height of the map to 100%, and also adds the data-role “content” to the container.
2. In order for the jQuery Mobile framework to change the size of the container automatically, we need to add a client page load event to resize the map and make sure it can fully fill the content DIV. In _Layout.cshtml, add the following function:
function addLoadEvent(func) {
       var oldonload = window.onload;
       if (typeof window.onload != 'function') {
             window.onload = func;
       }
       else {
            window.onload = function () {
            oldonload();
            func();
       }
    }
}
In the view page itself, we add the following JavaScript:
addLoadEvent(function () {
    Map1.updateSize();
});
3. You may notice that the content DIV might exceed the available screen area once we have applied the Header and Footer view to the application. To resolve this, try adding the code below to _Layout.cshtml:
$(document).ready(function () {
          // fix height of content to allow for header & footer
          function fixContentHeight() {
              var header = $("div[[data-role='header']]:visible");
              var footer = $("div[[data-role='footer']]:visible");
              var content = $("div[[data-role='content']]:visible:visible");
              var viewHeight = $(window).height();
              var contentHeight = viewHeight - header.outerHeight() - footer.outerHeight();
              if ((content.outerHeight() + header.outerHeight() + footer.outerHeight()) !== viewHeight) {
                   contentHeight -= (content.outerHeight() - content.height());
                   content.height(contentHeight);
                  }
               }
              $(window).bind("orientationchange resize pageshow", fixContentHeight);
              fixContentHeight();
});
And then apply the following CSS (Cascading Style Sheet) script to the page:
<style type="text/css">
  .ui-content
  {
    padding: 0;
  }
  .ui-footer, .ui-header
  {
    text-align: center;
    padding: 5px 0;
  }
</style>
Now that we have created a simple mobile application that displays a map successfully, we'll show you some additional useful functionality. For example, how to display a particular map extent.
For this example, we need to change the code in the view page as follows:
@{
     Html.ThinkGeo().Map("Map1", new System.Web.UI.WebControls.Unit(100, System.Web.UI.WebControls.UnitType.Percentage),
          new System.Web.UI.WebControls.Unit(100, System.Web.UI.WebControls.UnitType.Percentage))
          .MapBackground(new BackgroundLayer(new GeoSolidBrush(GeoColor.FromHtml("#E5E3DF"))))
          .CurrentExtent(-13939426.6371, 6701997.4056, -7812401.86, 2626987.386962)
          .MapUnit(GeographyUnit.Meter)
          .CustomOverlays(overlays =>
          {
            PointMarkerStyle pointMarkerStyle = new PointMarkerStyle();
            pointMarkerStyle.Popup.ContentHtml = "[[#AREANAME#]]";
            pointMarkerStyle.Popup.AutoSize = true;
            pointMarkerStyle.Popup.BackgroundColor = GeoColor.FromHtml("#E5E3DF");
            pointMarkerStyle.WebImage.ImageOffsetX = -10.5f;
            pointMarkerStyle.WebImage.ImageOffsetY = -25f;

            ClusterMarkerStyle markerStyle = new ClusterMarkerStyle();
            markerStyle.MarkerStyle = pointMarkerStyle;

            MarkerZoomLevelSet markerZoomLevelSet = new MarkerZoomLevelSet();
            markerZoomLevelSet.ZoomLevel01.CustomMarkerStyle = markerStyle;
            markerZoomLevelSet.ZoomLevel01.ApplyUntilZoomLevel = ApplyUntilZoomLevel.Level20;
                   overlays.WorldMapKitWmsWebOverlay("WorldMapKitOverlay").Projection(WorldMapKitProjection.SphericalMercator).Name("ThinkGeo World Map");
            overlays.FeatureSourceMarkerOverlay("markerOverlay").ZoomLevelSet(markerZoomLevelSet);
           })
        .Render();
}
Once you do that, you will see the following result:
You can see that the map extent has been updated to focus in on the United States.
NOTE: In this code, we are using WorldMapKitWmsWindowsPhoneOverlay as the base map, which renders map data from ThinkGeo's mobile-optimized World Map Kit WMS service. As an alternative, you can choose to use Bing Maps, Google Maps or OpenStreetMap as well.
Because we are using the WorldMapKitWmsWebOverlay in our sample, it was necessary that we set the projection to WorldMapKitProjection.SphericalMercator. It also is important that the MapUnit property of the Map object be set to GeographyUnit.Meter. This is because Shapefiles only store binary vector coordinates, which can be in decimal degrees, feet, meters, or numerous other unit systems, and our map has no way to know what the Shapefile's unit of measurement is until we tell it. The correct unit to use is typically found somewhere in the Shapefile's documentation or within its supplemental data file as discussed in the Map Suite MVC Edition Quick Start Guide's Shapefiles section.
Now we will show you how to perform a spatial query with a specified shapefile. For this example, we will use the Shapefile cities_a.shp, which can be found in the \App_Data folder of this guide's downloadable sample project.)
Download Sample Code From This Exercise (5.04 MB)
To make this work, we use ajaxCallAction in the view page to call the controller method. Let's do this step by step:
1. We add a method named GetPlaces to HomeController, which will return a RectangleShape type result. You'll want to use the code below:
[MapActionFilter]
public RectangleShape GetPlaces(Map map, GeoCollection<object> args)
{
    if (null != map)
    {
        string searchKey = args[[0]].ToString();
        int markerImageIndex;
        System.Int32.TryParse(args[[1]].ToString(), out markerImageIndex);

        Proj4Projection proj4 = new Proj4Projection();
        proj4.InternalProjectionParametersString = Proj4Projection.GetEpsgParametersString(4326);
        proj4.ExternalProjectionParametersString = Proj4Projection.GetGoogleMapParametersString();
        ShapeFileFeatureSource shapeFileFeatureSource = new ShapeFileFeatureSource(Server.MapPath("\\App_Data\\cities_a.shp"));
        shapeFileFeatureSource.Projection = proj4;
        shapeFileFeatureSource.Open();

        Collection<Feature> allFeatures = shapeFileFeatureSource.GetAllFeatures(ReturningColumnsType.AllColumns);
        Collection<Feature> resultFeatures = new Collection<Feature>();
        foreach (Feature feature in allFeatures)
        {
           if (feature.ColumnValues[["AREANAME"]].Contains(searchKey))
               resultFeatures.Add(feature);
        }

        FeatureSourceMarkerOverlay featureSourceMarkerOverlay = (FeatureSourceMarkerOverlay)map.CustomOverlays[["markerOverlay"]];
        InMemoryFeatureSource inMemoryfeatureSource = new InMemoryFeatureSource(new List<FeatureSourceColumn>() { new FeatureSourceColumn("AREANAME") });
        inMemoryfeatureSource.Open();
        foreach (Feature feature in resultFeatures)
        {
          inMemoryfeatureSource.InternalFeatures.Add(feature);
        }

        featureSourceMarkerOverlay.FeatureSource = inMemoryfeatureSource;

        PointMarkerStyle markerStyle = (PointMarkerStyle)((ClusterMarkerStyle)featureSourceMarkerOverlay.ZoomLevelSet.ZoomLevel01.CustomMarkerStyle).MarkerStyle;
        markerStyle.WebImage.ImageVirtualPath = "/Content/Images/" + markerImages[[markerImageIndex]];

        if (inMemoryfeatureSource.GetCount() > 0)
        {
            return inMemoryfeatureSource.GetBoundingBox();
        }
        else
        {
            return null;
        }
     }

     return null;
 }
Note: We need to add a MapActionFilter attribute to this method to modify the way the action is executed. e.g. Get the necessary parameters, like “map”, analyzed based on parameters passed from client side.
2. Add a client side function “findPlaces”
function findPlaces(value, markerImagesIndex) {
        if (value == //) {
            value = document.getElementById("searchValue").value;
            markerImagesIndex = 0;
        }

        Map1.ajaxCallAction('@ViewContext.RouteData.Values[["Controller"]].ToString()', 'GetPlaces', { category: value, ImagesIndex: markerImagesIndex }, function (result) {
            var value = result.get_responseData();

            if (value == //) {
                alert("No place is found!");
            }
            var bounds = OpenLayers.Bounds.fromString(value, false);
            Map1.zoomToExtent(bounds, false);
        });
}
Note: Map Suite MVC Edition provides a large number of client APIs that allow us to easily operate the map on the client side, just as we have done on the server side in the above example code. Here, you would use the ajaxCallAction to call the GetPlaces method that we just added.
Finally, we will have a project that looks like this on a mobile device or tablet:
We have introduced the basics of using Map Suite MVC Edition's mobile-friendly UI and a way of adding this functionality into your own applications. Let's recap what we have learned about the object relationships and how the pieces of Map Suite work together: